
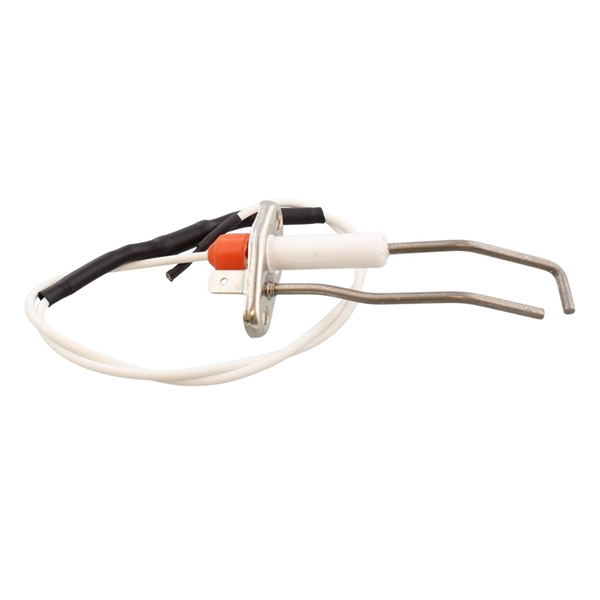
The ignition electrode is the small component that creates the spark to light your boiler’s gas burner. When it wears out or cracks, your boiler won’t ignite — leaving you without heating and hot water. The good news is that replacing an ignition electrode is one of the easiest boiler repairs you can do yourself.
At Boiler Spares Ltd, we stock ignition electrodes for Baxi, Worcester Bosch, Vaillant, Ideal, Glow-worm, Alpha, and more. This guide shows you how to replace an electrode on any boiler.
Signs Your Ignition Electrode Needs Replacing
- Boiler displays ignition lockout error (EA, E133, F28, or similar)
- You hear clicking but the boiler does not light
- The boiler lights briefly then goes out
- Intermittent ignition, especially on cold mornings
- Visible cracks or carbon buildup on the electrode tip
Tools You’ll Need
- Cross-head screwdriver
- 7mm or 8mm spanner (depending on boiler)
- Replacement ignition electrode — matched to your boiler model
- Soft cloth or fine sandpaper (for cleaning the burner if needed)
Step-by-Step Replacement Guide
Step 1: Isolate the Boiler
- Turn off the electrical supply at the fused spur
- Turn off the gas at the isolation valve beneath the boiler
- Allow the boiler to cool completely
Step 2: Remove the Boiler Casing
- Remove the front panel screws
- Some boilers have a drop-down panel; others slide upwards
- Take a photo of the wiring before disconnecting anything
Step 3: Locate the Ignition Electrode
- The electrode is a white ceramic probe with a metal tip
- It sits next to the burner, pointing at the flame
- On some boilers, the electrode and flame sensor are combined in one unit
Step 4: Disconnect the Wiring
- Pull the spade connector gently from the electrode terminal
- Do not pull the wire itself — grip the connector
Step 5: Remove the Old Electrode
- Undo the retaining screw or nut holding the electrode bracket
- Withdraw the electrode carefully — the ceramic is brittle
- Note the exact position and angle of the tip
Step 6: Fit the New Electrode
- Insert the new electrode in the same position
- Tighten the retaining screw — do not overtighten
- Reconnect the wiring spade connector
- Check the electrode gap is correct (usually 3–5mm — check your boiler manual)
Step 7: Reassemble and Test
- Replace the boiler casing
- Turn on the gas and electrical supply
- Run the boiler through a heating cycle
- Check for proper ignition and a stable blue flame
Electrode Gap: Why It Matters
The gap between the electrode tip and the burner must be precise:
- Too wide: Weak spark, intermittent ignition
- Too narrow: Spark shorts to the burner metal, no ignition
- Wrong angle: Spark misses the gas stream
Most electrodes are pre-set from the factory, but always check against the old electrode before fitting.
Ignition Electrode vs Flame Sensor
Some boilers have separate components:
- Ignition electrode: Creates the spark
- Flame sensor (ionisation probe): Detects that the flame is lit
If your boiler has a combined ignition and detection electrode, replace the whole unit. If they are separate and the boiler lights then goes out, the flame sensor may be the problem, not the ignition electrode.
Which Electrode Do I Need?
Order by part number or boiler model:
- Baxi: 248068, 5114748, 720301001
- Worcester: 87161064370, 87161077260
- Vaillant: 0020133658, 090724
- Ideal: 172531, 175583
- Glow-worm: S202216, S202215
If you’re not sure, send us a photo of your old electrode and boiler data plate — we’ll identify the correct part.
Shop Ignition Electrodes
At Boiler Spares Ltd, we stock genuine and compatible ignition electrodes for all major brands. Fast UK delivery from Huddersfield.